Once you’ve organized your tasks and set your priorities, it’s time to make a plan.
But why make a plan?
Plans—and the process of creating them—can help you:
- Use your time deliberately
Making decisions on where to put your limited time and energy helps you work on the to-dos that have the greatest impact on your goals and desires. - Uncover potential obstacles
Fixing our thoughts on paper or in a digital medium helps us see potential issues that could derail us, allowing us to make adjustments before we run into them. - Make trade-off decisions
Attempting to fit our to-dos into a fixed time period forces us to confront the limited nature of our time & energy and decide what to skip or take off our list. - Optimize your energy use
Mapping out our time helps us align what we do to our changing energy levels to optimize our flow states and match our work to our circadian rhythms. - Track your progress
Having a map of where you are going shows you where you are on your journey, so you quickly can see when you get off-track and need to course correct. - Improve over time
Reviewing the strengths and weaknesses of our plans afterwards helps us develop mitigation strategies that make us more productive in the future.
Plans change how you approach work by increasing your confidence and reducing overwhelm, making you more productive as a result.
Plans exist both on paper and the residue of the planning process in our head. That’s why it’s important to plan daily, even if you plan weekly or monthly.
Automated vs Manual Planning
As technology has evolved, a new category of planning software called auto-schedulers or AI schedulers has evolved.
The idea behind these is that if you connect them to your calendar, prioritize your tasks and estimate how long each task will take, the software will build a schedule for you.
In contrast, the Day Optimizer methodology explicitly requires manual planning. The reason for this is two-fold:
- Psychological Commitment
By “committing” to our to-dos then building “implementation intentions” by scheduling them, we’re creating psychological nudges that help us reduce procrastination and distraction. It’s harder to ignore plans we create ourselves than those given to us.[1] - Estimation Uncertainty
Automated systems require accuracy with your time estimations. For those doing novel or complex tasks, where uncertainty is high and you’re learning as you go along, accurate time estimates are near impossible. A manual planning system allows you to navigate this uncertainty easier by giving you more opportunities to course correct as you move through your work.
Both automated and manual planning can work—but they work best for different people.
If you are someone who tends to do the same type of work repeatedly and can predict with decent accuracy how long things take, automated planning software can help you minimize your planning time while still ensuring your schedule reflects your priorities.
Otherwise, if you are someone who is often doing things they’ve never done before, or where your tasks have unknowns that can drastically alter how long they take—such as is the case with most entrepreneurs and creative types—a manual planning process will help you regularly reorient toward your goals as conditions change.
Planning Using a Process
When creating a plan, it helps to use a process.
Processes help ensure you don’t miss anything as you create your plan, and can help to both optimize your thought processes and reduce potential biases.
The planning process for the Day Optimizer methodology is called CASE:
- Commit to what you plan to do today
- Allocate time to each commitment
- Schedule each commitment into a time slot
- Evaluate your schedule & make adjustments
The sections that follow will describe each step in depth, why there are 4 separate steps and how they help create a more realistic plan.
Commit
The first step in creating any plan is deciding what you want to do within the timeframe you are planning.
If you went through the Orient and Prepare steps before starting to plan, you should have a clear idea of your options—what you could potentially do.
The Commit step is the process of reviewing those options and adding them to a plan for a specific timeframe.
In Day Optimizer, your options are called To-Dos. Once you add them to a plan for a specific day, week or month, they become Commitments.[2]
Put another way, a commitment is the intention to do a specific to-do on a specific day, or within a specific week or month.
By committing to your to-dos in advance, it’s easier to stick to your plan and defend against interruptions, procrastination and impulsivity.
What to Review
When deciding what to do, review and add the following:
- Unfinished Tasks
Tasks you started, but haven’t finished yet (“open loops”). - Appointments
Events on your calendar that you might attend or need to be aware of to provide context during your planning process. - Activities
Things that take up time in your day that you do regularly, but are never done, e.g., lunch, meditation, daily devotion, etc. - Time Blocks
Facets of your life or work that you want to plan at a high-level without specifying exactly which tasks need to be done. - New Tasks
Tasks that you haven’t started yet.
Be deliberate about what to add. Just because an appointment is on your calendar doesn’t mean you need to attend it. Just because you started a task doesn’t mean you need to finish it.
Take the time to figure out what is most important right now, and add only those items into your plan.
Tasks that are no longer relevant can be marked Won’t Do, while tasks that aren’t relevant right now can be snoozed or deferred until they are relevant.
Where To Add Them
Add each of these to-dos to a commitment list that is specific for the time period you are planning.
So, if you are planning tomorrow, add it to your daily commitment list for tomorrow. If you are planning this month, add it to your monthly commitment list.
Why create a separate commitment list when you could just work from your master task list instead?
Creating a separate commitment list each day helps you:
- Limit distraction
Removing to-dos you don’t plan to work on help us avoid being distracted by them and falling prey to “productive procrastination”, where we work on something that’s easier to avoid working on what we should be working on. - Reduce overwhelm
Repeatedly looking at the size of your master task list throughout the day can be overwhelming, drain our energy and cause us to procrastinate. Focusing on a much shorter list helps us avoid this feeling and build momentum as we check things off it. - Track accomplishments
Keeping a separate list where we can check things off—even if they are activities that we do every day or tasks that we worked on today, but didn’t get done—help us see where our time went and everything we got accomplished, which can improve our mood and increase motivation[3]. - Account for everything
Seeing all of your to-dos in one place makes them easier to manage and empowers you to make trade-offs between your tasks, appointments and daily activities that you might not consciously make if you were tracking these in your task manager, your calendar and your head.
Building a commitment list is the first step toward creating any plan within the Day Optimizer methodology, and for certain days, can be an effective plan in itself.
If you’ve never created a daily commitment list, the clarity that comes from seeing all of your to-dos on a single page can be powerful.
Commit to Breaks
Studies indicate that taking regular breaks throughout the day increases productivity and well-being.
To ensure you take your breaks, add them as commitments to your daily plan. This has the added benefit that once you take a break, you can cross it off, giving you a sense of accomplishment that can help you build motivation throughout the day.
For short breaks, you can also add a tag like #Take5After to specific commitments to prompt you to take a break when you finish working on them for the day.
Without breaks, our productivity starts to decline before we even notice. It’s often only after our productivity has significantly declined that we recognize we need a break.
Allocate
Once you’ve decided what to work on, it’s time to figure out how long to work on each item. This is the step where we move from task management into time management.
Before we get into how exactly to do that, let’s go over a few key concepts.
The Difference Between Time Estimation and Time Allocation
You’re probably familiar with the concept of time estimation, but have you heard about time allocation? What exactly is the difference?
- Time estimation is figuring out how long a task will take to complete.
- Time allocation is figuring out how long to spend on it during a specific timeframe (e.g., today, this week or this month).
Accurately estimating time is hard.
Time estimation is both an art and a science. For repetitive and simple tasks, you can learn to create fairly accurate time estimates. But for complex or novel tasks, hidden unknowns make accurate time estimations near impossible.[4]
Time allocation is much easier. Instead of asking how long a task will take to complete, you are asking how much time to spend on it during a specific timeframe.
If you are planning your day, you are deciding how much time to spend on it today. If you are planning your week, you are deciding how much time to spend on it this week.
Deciding how much time to spend on a task, based on your current priorities, usually requires less effort than trying to figure out exactly how long until you can mark off your task as complete.
Not only is it easier to allocate time, it has the added benefit of shifting your mindset from focusing on accomplishment to focusing on making progress—which, ironically, can help you achieve more[5].
Allocating Time Using Time Increments
When allocating time, it helps to use multiples of a fixed time increment.
For example, if you use a 15-minute time increment, you can allocate either 15 minutes to an item or 30 minutes to an item, but not 7 minutes or 25 minutes.
Why should you use fixed time increments?
Using a fixed time increment:
- Simplifies scheduling
Aligns items to the start of each hour on a schedule, making it easier move items around when adjusting your schedule. - Reduces analysis paralysis
Fewer options mean less work when allocating time. Instead of worrying whether you should allocate 15, 20 or 25 minutes to an item, you simply need to choose between 15 and 30 minutes. - Avoids micro-scheduling
When allocating items at too fine of a granularity, we fall into the planning fallacy and assume everything goes exactly to plan—which it almost never does. - Adds built-in buffer time
Rounding up gives us little bits of buffer time throughout the day to account for when things take longer, or when we get interrupted or distracted.
Given that we should be using fixed time increments, which increment should you use?
That depends on the type of work you are doing, your personality and how you are managing your plans.
If your plan focuses on long stretches of work, planning at 1-hour increments can provide you an effective high-level schedule.
If you use a paper planner, it usually comes with 30-minute increments, though some go down to 15-minutes. Larger increments let you fit more on a single page without cramping your writing, but reduce your ability to fit quick items in throughout your day.
For most people, I recommend 15-minute increments, since it’s granular enough to fit small items in, but not so granular that you start micro-scheduling your time.
Whatever you do, avoid increments smaller than 10 minutes. At that point, you’re essentially no longer using an increment, but just using ad-hoc time allocations that you are rounding up or down.
How to Allocate Your Time
Now that you know the difference between time estimation and allocation, and have chosen a fixed time increment to allocate your time with, it’s time to allocate your commitments.
In the Commit step, you decided what to work on during your planning timeframe. In the Allocate step, you’re doing to decide how long to work on each item.
Go through each item and assign a duration based on your fixed time increment.
For example, you might choose 1 hour to work on your taxes, 30 minutes to check your email in the morning and 15 minutes to mediate or do a daily devotion.
A couple of tips while going through this process:
- Allocate more time than you think is necessary—most of us are time optimists who assume everything goes exactly to plan, which it rarely does.
- Add extra time for preparing and wrapping up, such as travel time, reviewing your notes or setting up your work area. See the Prep > Do > Wrap power up for more details.
- Skip allocating items that you can do in under 2 minutes. These you can squeeze in throughout your day whenever you have a spare minute.
- Use a default time allocation for activities you do regularly, to avoid having to allocate these each day. For instance, you might always schedule 30 minutes for lunch.
Make sure to allocate all of your commitments before you move onto the Schedule step.
Why It’s Important to Allocate Everything Before Scheduling
Many people skip the Allocate step and go straight to scheduling, figuring they can allocate the time for each item as they schedule it—but this can result in an unrealistic schedule.
By allocating time to your commitments before you schedule them, you avoid the tendency to under allocate time as you start seeing your available time run out.
Most of us want to get as much done in our days as possible. So as we see the available time in our schedule shrink, we start, consciously or unconsciously, under allocating time to items.
That task you normally would spend an hour on, you can do in 30 minutes. Even though it takes you 30 minutes every day to each lunch, today you can do it in 15 minutes.
This results in a schedule with unrealistic time allocations, setting you up for failure from the start.
Allocating everything before you start scheduling doesn’t solve this problem entirely—you can always change your allocations while scheduling—but it biases you toward better time allocations, since we usually go with the default.
The key is not to prioritize what’s on your schedule,
but to schedule your priorities.
– Steven Covey
Schedule
Now that you have committed to what you want to work on today and allocated time to those commitments, it’s time to decide when to work on each of those commitments.
Scheduling is the process of taking each of your allocated commitments and assigning them to a specific time slot in your day (or, if you are doing weekly planning, to a specific day of your week).
The process of creating a schedule helps you create time-based “implementation intentions“—if/then plans that research shows increases the chance that you’ll do what you say you’re going to do.
For instance, if it’s 10 am, then I’ll start working on marketing.
The objectiveness of the current time can be a useful tool to help you beat procrastination and distraction.
When your starting conditions are fuzzy, it’s easy to let things slide and convince yourself that you are still following your plan. But when you set 10 am as your start time—and it’s 10 am—it’s hard to deny that you should be starting on what you said you were going to do.
That’s not to say that if you schedule all your commitments, you’ll completely beat procrastination—but it creates a clear indication of delay so you can catch yourself earlier and get back on track.
Why Create a Schedule?
Many people resist creating a schedule, thinking of schedules as too rigid or that their days are too chaotic to schedule.
Sometimes this is true, which is why I created the Time Bucket as a planning method that takes time into account, but doesn’t require scheduling items at specific times.
However, the point of the schedule isn’t to create an exact plan for your day that you follow precisely—though if that happens, that’s wonderful.
The point of a schedule within the Day Optimizer methodology is two-fold:
- Create a roadmap for your day
- Encourage deliberate trade-off decisions
Let’s tackle each of these individually.
Using a Schedule as a Roadmap
When going on a road trip, it helps to map out your route to see the route you will take. This can help you figure out the pacing of your trip, what construction you might want to avoid, where it makes sense to stop for breaks and how long overall you’ll need.
Think of your schedule in the same way.
Both a schedule and a roadmap help you track your progress, highlight potential roadblocks, indicate good times to take a rest and tell you the total amount of effort required.
One of the key benefits of a plan—any plan—is to track your progress against that plan so you know where you stand. A schedule has the benefit of being a plan that ties progress into the passage of time.
Halfway through your list is rarely halfway through your allocated effort which is rarely halfway through your available time. Knowing how much time is left and how much effort is required helps you make real-time decisions on how to navigate your day.
Using a Schedule for Trade-Off Decisions
When building a schedule for the first time, you’ll likely overcommit yourself. It’s natural and part of the reason there is an Evaluate step after you create your schedule.
Most of us are time optimists—we think we have far more time in our day than we actually do. The result is that we commit to far more than we can actually do in a day.
If we only do task management, we may never notice this; or only notice it at the end of the day when it’s too late and we’re lamenting on how much of our list we didn’t get done.
One of the benefits of managing time directly via a schedule, is that we can see when we’re overcommitting ourselves and take steps to correct the situation before we start executing our plan.
A schedule, then, is a reality-check. It forces us to make trade-off decisions for what we want to attempt to accomplish today.
Actually, let me more specific:
A schedule helps us make deliberate trade-off decisions on what priorities to tackle on any given day.
Not creating a time-based plan doesn’t eliminate the trade-off decisions; it just hides the decisions and makes them implicit.
While the process of creating of a schedule forces us to make trade-off decisions during the planning process, a schedule itself can help us make trade-off decisions during the day.
If a schedule is a roadmap for our day, being able to see exactly how off plan we are allows us to make decisions on what to skip, what to shorten and what to reschedule, so we can still make the best use of our time when our day doesn’t go exactly to plan.
For instance, if I create a schedule from 9a–5p, I might do a quick check in after lunch to see where I am relative to that plan. If I’m behind—and I still want to end my day at 5p—I know I need to skip commitments on my schedule. So I can deliberately go through and decent what I’m not going to do, to ensure I can do the things that will have the biggest impact on my goals and desires.
Making explicit trade-offs before the fact rather than implicit trade-offs which can only be recognized after the fact is a key way creating and using a schedule helps you regain control of your time.
Anchors, Bumpers & Core Commitments
Before scheduling your commitments into specific time slots, consider this framework to help identify how important a commitment is toward your goals and desires.
Label each of your commitments as one of these:
- Anchor
Anchors represent your highest priorities: the urgent fires that must be handled and the important investments of your time that give you the greatest returns. Build your day around your anchors and aim to do only 1-2 anchors a day. - Bumper
Bumpers represent your low to medium priorities. They are important enough to schedule, but it’s not a huge issue if they don’t get done. Marking commitments in advance as bumpers eliminates the need to decide in the heat of the moment which commitments to skip when your day doesn’t go exactly to plan. - Core
Core commitments sit between anchors and buffers. You should make every effort to tackle these, unless it means you won’t get done one of your anchors. Foundational activities that maintain your energy and focus, like meals and exercise, fall under core commitments, as do most time blocks.
Sometimes you’ll label to-dos as existing permanently in one of these categories. Other times, you may decide for a specific day that a commitment should fall into one of these categories.
How to Create a Schedule
To create a schedule, go through every allocated commitment and assign it to a specific time slot in your day.
That, of course, is easier said than done.
If you’ve overcommitted—which most of us do—you’ll wind up running out of time slots within which to schedule commitments. Even if you didn’t, the way you build your schedule can affect how effectively you can execute that schedule.
The process of creating a schedule varies depending on your preferences, your goals and your energy when creating your plan.
However, every scheduling process involves at least two aspects, whether conscious or unconscious:
- What order to schedule items
- When to schedule each item
How you approach the answers to these questions can change the result of your schedule. Let’s explore some strategies for each of these to help you create better schedules.
What Order to Schedule Items
The order you schedule your commitments can drastically alter the results, since what you schedule into a time slot becomes the default for that time and requires more psychological effort to move later.
Thus, scheduling more important items before less important items leads to a more effective schedule. However, how you define “important” can vary.
Three strategies you can use to optimize the order your schedule items are:
- Anchors First
Anchors represent the top priorities in your work and life—the commitments that have the greatest impact on your goals and desires. Usually these have been allocated the most time as well, so scheduling these first allows you to fit them into your day, which they may not, if you leave them until later in your scheduling process. Scheduling these first allows you to build your day around these key commitments. - Foundational Activities First
Foundational activities provide you the energy and mindset to tackle all your other work. These are activities that, if not done, leave you feeling lethargic, distracted and unmotivated. Examples include meals, exercise and mental centering activities like meditation and daily devotions. Scheduling these first ensures you don’t suffer the consequences of skipping them. - Fixed Commitments First
Appointments on your calendar represent your fixed commitments. These are to-dos that you must do at a specific time. You may have the flexibility to skip, cancel or reschedule them, but you don’t have the ability to do them at an arbitrary time in your day. Scheduling these first helps you see where you have large chunks of time in your day to schedule your anchors.
Often you’ll use a mix of these strategies.
For instance, scheduling your highest priority fixed commitments first, then your anchors, then your highest priority foundational activities then moving onto lower priority fixed commitments and activities.
When to Schedule Items
When it comes time to schedule a commitment, into which time slot do you schedule it?
When the commitment only fits in one place in your day, the answer is obvious. But when you have multiple options for when to schedule an item, how do you schedule it at the optimal time?
Some strategies for deciding when to schedule a commitment:
- Align to Your Biorhythms
Research shows there may be an optimal time for different types of tasks. If you’re an early bird, do your analytical tasks in the morning and creative tasks in the afternoon; if you’re a night owl, do the reverse. See the Leveraging Your Biorhythms power up for more details. - Do Higher Priorities Earlier
While aligning to your biorhythms make sense, commitments later in the day will always be subject to disruptions to your schedule earlier in the day. Thus, the earlier you can tackle your priorities, the better. Time management is one place where you don’t want to save the best things for last. - Place Bumpers After Deep Work
Feeling constrained by a schedule after you’ve gotten into the flow while doing deep work is one reason people avoid creating a schedule. The solution isn’t to throw away the benefits of a schedule entirely, but to adapt how you schedule: schedule bumper to-dos after your deep work. Then, if you’re in the flow, you can skip (“bump”) the next item to stay in flow; otherwise, if you’re not feeling it or at a good stopping point, you can follow your schedule and do your bumper to-do. - Identify Your Low Interruption Zones
Figure out which parts of your day you are least likely to be interrupted and schedule your mentally intensive work during these times. This is especially important for work where you need to maintain a lot of context in your working memory to be effective (writing, programming, problem solving, etc).
As with the strategies for deciding what order to schedule items, you’ll often use multiple strategies to determine when to schedule items.
For instance, you may schedule your highest priority commitment first thing in the morning to ensure it gets done, schedule your deep work during your interruption-free time and place your bumper commitments after your deep work time blocks.
Quick Scheduling Tips
Want to build the most effective schedule you can?
Two quick tips for improving how you create your schedule:
- Schedule In Breaks
Plan to take breaks throughout the day to maintain your energy and focus. These can be short 5-minute breaks in between commitments or longer 15- to 30-minute breaks you schedule into time slots in your day. Use a combination of quiet breaks, like naps or meditation, and active breaks, like taking a walk or emptying the dishwasher, to optimize your productivity. - Leave Room for Opportunities
Avoid the urge to plan every minute of your day, or to overload yourself with so many things to do that you’ll never accomplish it all. A good rule of thumb is to leave 20% of your day free to handle interruptions and to take advantage of opportunities as they arise.
As time optimists, the biggest mistake most people make when creating their schedule is trying to pack too much into their day.
Evaluate
The final step of the Day Optimizer planning process is to take a step back and evaluate your plan, then make adjustments to improve it.
The first draft is never perfect. It is through the editing process that we create the refinements that allow us to produce better work.
Let’s look at two strategies for evaluating and improving our plans.
Uncommit from Lower Priorities
Review everything you added to your plan in previous steps. What isn’t necessary and can be limited?
“Uncommit” from these commitments by taking them off your plan completely so they don’t distract you throughout the day.
Did you create a schedule?
Review all of the allocated commitments that didn’t fit into a time slot on your schedule. Are any of these more important than items you scheduled?
If so, remove the less important item from your schedule and schedule the higher priority in its place.
Any remaining items that cannot be scheduled are, by definition, lower priorities than those on your schedule. Uncommit from these and remove them from your plan entirely.
Did you create a time bucket?
A time bucket provides a fixed amount of time within which to plan your day. That fixed amount of time acts similar to a schedule, helping you to make trade-off decisions as to what your priorities are.
Add up all of the time allocated in your time bucket, then compare it to the amount of available time you have.
Review all of the commitments currently in your time bucket. What is the least important item? Uncommit from this item and subtract its duration from your total allocated time.
Repeat until your total allocated time is equal or less than your available time.
The result of this process of evaluation will be that you only have commitments on your plan that you have a realistic chance of working on—and these commitments will be the most important ones.
Check Timings
Reducing the number of commitments on your schedule so you don’t overcommit yourself is important, but if you want to take your schedule to the next level, scan through your plan and adjust the timings of the commitments that remain.
Look at how commitments relate to one another and how they relate to the time in your day:
- Do the items align with your circadian and other biorhythms?
- Is your highest priority scheduled as early in the day as makes sense for you?
- Have you placed bumpers after commitments requiring flow states?
- Did you schedule regular breaks throughout the day, and after mentally or physically intensive work blocks?
- Did you allocate enough time to each commitment, or are you being too optimistic for some?
Spend a minute or two to mentally rehearse your day and confirm that the sequence of commitments in your day makes sense and aligns with how your energy ebbs and flows throughout the day.
Then go through and make adjustments until you have a day you feel you can realistically execute.
Because if you can’t imagine making it through your schedule at the beginning of your day, it’s highly unlikely you’ll be able to execute that schedule. Schedules don’t become more realistic as we execute them.
For more details on adjusting the timing of your commitments, go back and review the “When to Schedule Items” section of How to Create a Schedule.
3 Types of Plans
In the Day Optimizer methodology, there are 3 different types of plans you can create based on your energy, available planning time and structure of your day:
- Commitment List
- Time Bucket
- Schedule
Each of these plan types uses steps from the CASE workflow and can be created on a daily, weekly, monthly or even yearly basis.
Commitment List
A commitment list is a list of all of the to-dos you plan to tackle within a specific timeframe.
For instance, a daily commitment list contains everything you plan to do on a single day.
A daily commitment list differs from a daily task in two important ways:
- All To-Dos
A commitment list contains everything you plan to do, not just your tasks. In the Day Optimizer methodology, to-dos include not only tasks, but appointments and activities. - Commitment
The term “commitment” evokes a stronger impetus to work than “task”, adding a subtle psychological nudge to help you reduce procrastination and distraction.
Commitment lists are the quickest and easiest plan type in the Day Optimizer methodology.
Building a Commitment List
To build a commitment list, use the Commit and Evaluate steps of the CASE workflow:
- Commit to what you plan to do
- Evaluate what to remove to make your plan realistic
Using a Commitment List
Once you’ve created your commitment list, refer to it whenever you need to figure out what to do next.
After you’ve worked on a commitment, cross it off using Done Today if it’s a task and you still have more work to do, or Done Forever if it’s completely done.
Whenever you’re feeling behind, take a few minutes to evaluate your progress and explicitly decide to skip lower-priority commitments by marking them Skip.
When to Use a Commitment List
Use a commitment list on days where you don’t know how much time you’ll have or where your available time is scattered throughout the day, such as travel or conference days.
Time Bucket
A time bucket is a list of allocated commitments that fit within a fixed amount of time (the “bucket”).
Time buckets help you:
- Make Time-Based Trade Offs
The fixed amount of time in a time bucket helps visualize the limited amount of available time you have in your day, helping you to make deliberate trade offs with what fits into this time. - Build Time Awareness Without a Schedule
If you resist scheduling commitments at specific times, or due to your energy or the structure of your day, you can’t, a time bucket still brings an awareness of time into your planning process, helping you shift from task management to time management. - Track Your Progress
A time bucket can show you in real-time where you are relative to what you planned to do today, so you can make adjustments throughout your day.
But what exactly is a time bucket?
The easiest way to understand it is through a metaphor…
The Bucket & Blocks Metaphor
Imagine a bucket where each commitment is a wooden block. The height of the block is based on the time allocated to that commitment. So an hour commitment would be twice as high as a 30-minute commitment.
Next, imagine a bucket whose height represents the amount of time you have available in your day.
If you stack your commitment blocks in that bucket, you’ll immediately see if you’ve overcommitted yourself for your day and can remove (“uncommit”) from blocks to make sure they fit within your bucket.
To make this an effective time bucket to use, let’s stack the remaining blocks in execution/priority order, with the items we’re going to do first at the top and the items we’re going to do last at the bottom.
When organized like this, to figure out what to do next during the day, all we need to do is pull out the next block from the bucket.
Already this is useful. The height of the blocks and the bucket tells us when we’re overcommitted and the ordered blocks help us ensure we do things in the right order based on our priorities and other constraints.
The Rain as Time Passing Metaphor
Now imagine that time is passing throughout the day and we want to figure out what we can accomplish in the time we have left. A time bucket can help us here too.
Imagine time passing as rain falling from the sky. As it falls, it fills up the bucket, getting the blocks at the bottom of the bucket wet and eventually submerging them underwater.
If every time we finish a commitment block we move it to the bottom of the bucket, all the remaining blocks will be moved up higher in the bucket.
This creates a balance between our finished commitment blocks and the falling rain submerging the blocks at the bottom, allowing us to always know where we stand in our day.
Commitment blocks we won’t have time to get to today will be underwater, while those we still have time to do will be above water.
Now that you understand the metaphor, let’s explore how to implement this on paper or in software.
Building a Time Bucket
To build a time bucket, use these alternate steps of the CASE workflow:
- Commit to what you plan to do
- Allocate time to each commitment
- Sort the commitments in execution order
- Evaluate what to remove to make your plan realistic
Notice the Schedule step has been replaced with the Sort step. Since a time bucket doesn’t assign commitments to specific time slots, there’s no need to schedule commitments.
However, the order you place your commitments into your time bucket is important. The most important commitments—those you should do first—should be placed at the top while the least important commitments are placed at the bottom.
Doing this makes the evaluate step easier, since you can simple remove items from the bottom of your stack until the duration of the remaining items is equal to or less than the time available in your time bucket.
Using a Time Bucket
Once you’ve created your time bucket, refer to it whenever you need to figure out what to do next.
As with the commitment list, you can mark off tasks as:
- Done Today
You worked on the task, but have more work to do. - Done Forever
You finished the task completely. - Skip Today
You won’t work on the task today, but want to in the future. - Won’t Do
You decided the task no longer needs to be done at all.
Appointments and activities you can mark off as either Done or Skip.
When using the Day Optimizer app, once you mark a commitment with one of these statuses, it will fall to the bottom of the bucket and push the remaining active commitments upwards.
If you’re using the paper template, you can’t easily move the commitment (unless you want to be erasing all day), but you can use the status tracking column to mark off the time and see where you stand with your remaining commitments.
Either way, once you’ve spent your time working on the top commitment in your bucket and marked it with a status, you can pick the next active commitment from the top of the stack and start working on it.
When to Use a Time Bucket
Use a time bucket on days where a schedule feels too constraining or where you anticipate interruptions and distractions will make it hard to stick to a fixed schedule.
Time buckets help you remain aware of time, so you don’t go down rabbit holes and can reduce scope when you need to fit multiple priorities into your day. But they avoid the need to constantly reschedule your day when you get pulled in other directions.
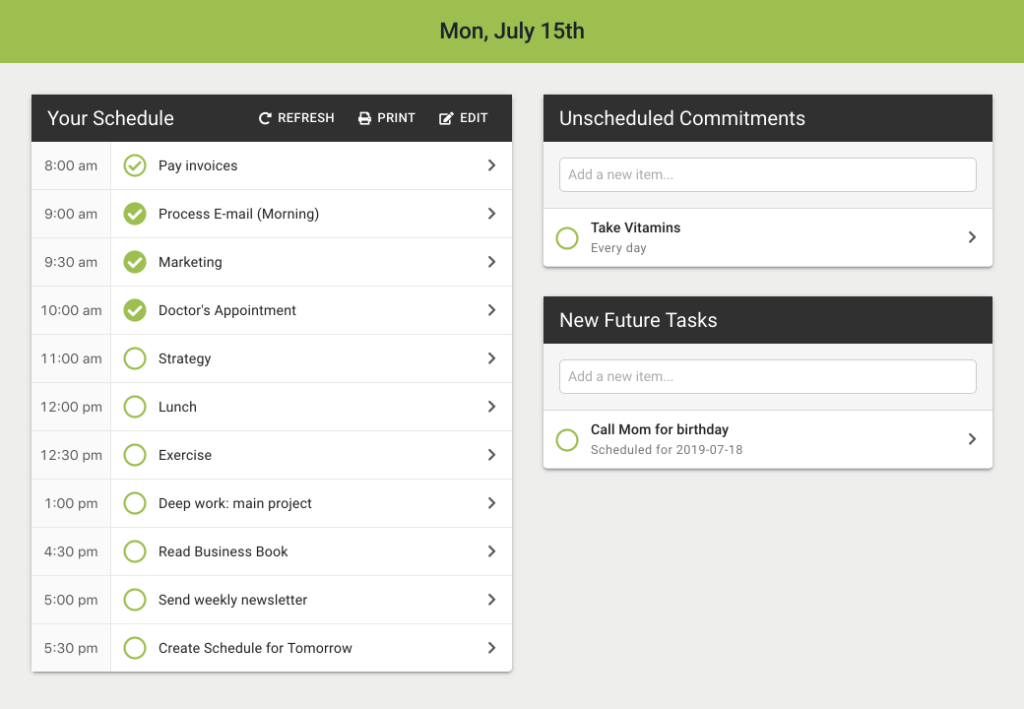
Schedule
A schedule is a list of allocated commitments assigned to a specific time slot. The granularity of your time slot will depend on the timeframe you are planning.
For instance, a daily schedule might assign items into 15-minute intervals throughout your day, while a monthly schedule might assign items to a week of the month instead.
Schedules help you map out your day, to ensure it is realistic and to align what you do throughout your day to the optimal times for you to do those type of to-dos.
The limited amount of time available in a schedule forces you to make explicit trade-off decisions on what to include in your plan and reduces the chance that you’ll overcommit yourself.
Finally, schedules provide an objective way to track your progress throughout the day. You can immediately see what time it is, compare that to your schedule, and see if you are ahead or behind your plan.
Building a Schedule
To build a schedule, use all the steps of the CASE workflow:
- Commit to what you plan to do
- Allocate time to each commitment
- Schedule the commitments into specific time slots
- Evaluate what to remove to make your plan realistic and how to adjust your plan to better leverage your biorhythms
While creating a schedule takes longer than a commitment list or a time bucket, the assignment of commitments into specific time slots provides not only objective start and end times for each commitment, but the ability to double-check that the scheduled time works within the broader context of your day.
For instance, when planning outside exercise, you adjust your time slot based on the weather during your planning process so you don’t miss nicer weather at a different part of the day or week.
Using a Schedule
Once you’ve created your schedule, refer to it regularly to see if you are on track and what your next commitment is.
Take a few minutes at fixed times to evaluate whether you need to reschedule your day, and if so, consider how you might need to reschedule:
- New Schedule
Keep your existing commitments and allocations, but start with a blank slate and reschedule your day from this point forward to ensure you can get your highest priorities done. - New Commitment
Add a new commitment, such as an appointment, into your schedule and adjust your existing commitments around it. - Reorder Commitments
Change the order you plan on doing your commitments. - Swap Commitments
Remove a commitment and swap in one or more other commitments, e.g. for an unexpected urgent item. - Drop Bumpers / Low Priorities
Remove lower-priority commitments based on the available remaining time in your day and compress your remaining commitments into freed up time slots.
For instance, for a daily schedule, take a few minutes after lunch to evaluate your progress and any new commitments that have appeared. If you are behind, take the time to update your plan so you optimize the time you have left.
When to Use a Schedule
Use a schedule whenever you have the energy to go through the entire planning process. A schedule provides benefits above and beyond a commitment list and a time bucket, so should be your default plan type when you can manage it.
But if you are new to creating schedules, start with creating commitment lists first, then time buckets, so you learn the process and the benefits of those plan types before tackling a full schedule.